MySQL多主自动同步配置并实现负载均衡健康检查
![H%}O_F2V4`_8WBO$HDX3]K0](http://static.nbla.cn/Uploads/image/2017-03-31/14909689979919.jpg?watermark/1/image/aHR0cDovL3N0YXRpYy5uYmxhLmNuLzEzMTAxMTYxMDktMi5wbmc=/dissolve/100/gravity/SouthEast/dx/10/dy/0 "H%}O_F2V4`_8WBO$HDX3]K0")
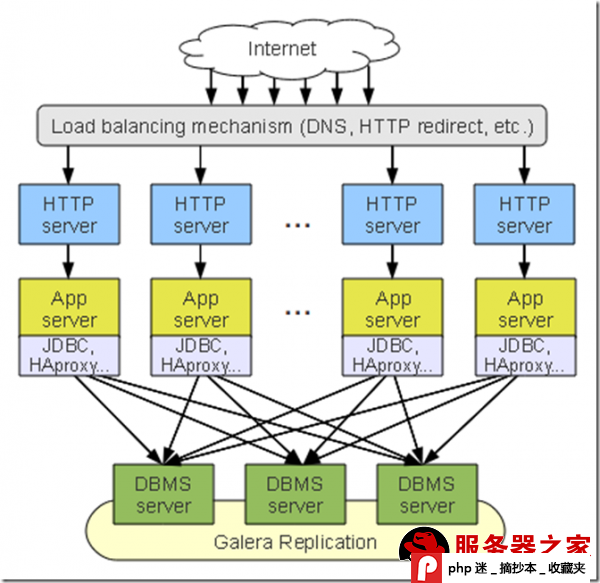
mysql多主同步方案简单实用,可用于生产环境,适合于数据库压力比较大的场景,扩容方便简单,利用haproxy实现负载均衡和故障检测。
参考:
1.环境
ubuntu12.04 64bit
node1 10.10.10.11
node2 10.10.10.12
node3 10.10.10.13
MariaDB-galera-server-5.5
haproxy 10.10.10.20
2.安装源
ubuntu
sudo apt-get install python-software-properties
sudo apt-key adv ?recv-keys ?keyserver keyserver.ubuntu.com 0xcbcb082a1bb943db
sudo add-apt-repository ‘deb http://mirror.yongbok.net/mariadb/repo/5.5/ubuntu precise main’
3.安装
apt-get update
apt-get install mariadb-galera-server-5.5 galera
4.配置
node1 10.10.10.11
vi /etc/mysql/my.cnf
[mysqld]
# 1. Mandatory settings: these settings are REQUIRED for proper cluster operation
query_cache_size=0
binlog_format=ROW
default_storage_engine=innodb
innodb_autoinc_lock_mode=2
# innodb_doublewrite=1 ? this is the default and it should stay this way
# 2. Optional mysqld settings: your regular InnoDB tuning and such
datadir=/www/mysql
innodb_buffer_pool_size=28G
innodb_log_file_size=100M
innodb_file_per_table
innodb_flush_log_at_trx_commit=2
# 3. wsrep provider configuration: basic wsrep options
wsrep_provider=/usr/lib/galera/libgalera_smm.so
wsrep_provider_options=”gcache.size=32G; gcache.page_size=1G”
wsrep_cluster_address=gcomm://
wsrep_cluster_name=’gaojinbo_galera_cluster’
wsrep_node_address=’10.10.10.11′
wsrep_node_name=’node1′
wsrep_sst_method=xtrabackup
wsrep_sst_auth=gaojinbo:gaojinbo.com
node2 10.10.10.12
vi /etc/mysql/my.cnf
[mysqld]
# 1. Mandatory settings: these settings are REQUIRED for proper cluster operation
query_cache_size=0
binlog_format=ROW
default_storage_engine=innodb
innodb_autoinc_lock_mode=2
# innodb_doublewrite=1 ? this is the default and it should stay this way
# 2. Optional mysqld settings: your regular InnoDB tuning and such
datadir=/www/mysql
innodb_buffer_pool_size=28G
innodb_log_file_size=100M
innodb_file_per_table
innodb_flush_log_at_trx_commit=2
# 3. wsrep provider configuration: basic wsrep options
wsrep_provider=/usr/lib/galera/libgalera_smm.so
wsrep_provider_options=”gcache.size=32G; gcache.page_size=1G”
wsrep_cluster_address=gcomm://10.10.10.11
wsrep_cluster_name=’gaojinbo_galera_cluster’
wsrep_node_address=’10.10.10.12′
wsrep_node_name=’node2′
wsrep_sst_method=xtrabackup
wsrep_sst_auth=gaojinbo:gaojinbo.com
5.添加用户
GRANT USAGE ON *.* to gaojinbo@’%’ IDENTIFIED BY ‘gaojinbo.com’;
GRANT ALL PRIVILEGES on *.* to gaojinbo@’%';
GRANT USAGE ON *.* to gaojinbo@’localhost’ IDENTIFIED BY ‘gaojinbo.com’;
GRANT ALL PRIVILEGES on *.* to gaojinbo@’localhost’;
安装xtrabackup
由于同步使用的是xtrabackup,所以必需安装(略)
6.启动集群
node1
/etc/init.d/mysql start
node2
/etc/init.d/mysql start
7.查看状态
mysql -uroot -p
SHOW STATUS LIKE ‘wsrep_%’;
show databases;
这时node1的所有库已同步到node2了,这时集群还是主从模式,需要配置node1,添加配置从node2同步数据,这样才是主主模式
8.配置主主模式
node1 10.10.10.11
vi /etc/mysql/my.cnf
[mysqld]
wsrep_cluster_address=gcomm://
修改为:
wsrep_cluster_address=gcomm://10.10.10.12
9.重启node1并查看状态
/etc/init.d/mysql restart
mysql -uroot -p
SHOW STATUS LIKE ‘wsrep_%’;
show databases;
这时node2的所有操作就能自动同步到node1了,主主模式配置完成
9.添加新node到集群
可以任意新增多台Node到Cluster,设置过程非常简易
1)安装 MariaDB Server
2)安装 Galera Library
3)设定 wsrep_cluster_address=”gcomm://10.10.10.11″
4)安装xtrabackup
添加新node需要修改所有node的gcomm://值,比如添加了新Node 10.10.10.13,我们就必须改动其它Node的gcomm://设定,并且重新启动mysqld服务
为了不影响业务,可以通过下面方法修改,不需要重启服务:
mysql -uroot -p
SHOW VARIABLES LIKE ‘wsrep_cluster_address’;
SET GLOBAL wsrep_cluster_address=’gcomm://10.10.10.11,10.10.10.12,10.10.10.13′;
SHOW VARIABLES LIKE ‘wsrep_cluster_address’;
重要:
最后需要注意的地方是,由于我们每一台机器都互相设定,如果要关闭全部Node机器,请务必将第一台重新设定gcomm://为空值,让后续重新启动的机器可以先连上此机器进行同步如果不设置gcomm://为空值,mysql集群将无法启动
10.测试多主同步
登录node1,node2,node3节点,每个节点只建立1个数据库,如
mysql -uroot -p
create database gaojinbo1;
create database gaojinbo2;
create database gaojinbo3;
每个节点上运行,查看数据库:
show databases;
正常情况会显示出gaojinbo1,gaojinbo2.gaojinbo3
11.配置haproxy
实现功能:
1)健康检查,down机的mysql自动从业务去除
2)负载均衡,配置专用的mysql读,写集群IP,程序通过该IP处理业务
下面haproxy配置使用自带的mysql检测功能,只能检测mysql是否存活。
如果要检测数据库一致性,需要配置xinetd服务写检测脚本通过option httpchk实现(略)
1)安装haproxy
wget http://haproxy.1wt.eu/download/1.4/src/haproxy-1.4.23.tar.gz
tar xvzfhaproxy-1.4.23.tar.gz
cd haproxy-1.4.23
make TARGET=generic
make install
2)添加mysql用户,在集群任何一台操作即可,会自动同步
添加权限,用于haproxy检测,不需要任何权限,haproxy只检测是否能正常连接关闭mysql
mysql -uroot -p
GRANT USAGE ON test.* to gaojinbo@’10.10.10.1′;
3)建立haproxy配置文件
vi /etc/haproxy.cfg
global
maxconn 40000
#debug
daemon
#quiet
user haproxy
group haproxy
nbproc 1
log 127.0.0.1 local3
spread-checks 2
defaults
timeout server 5m
timeout connect 5m
timeout client 5m
timeout http-request 30s
timeout queue 5m
frontend db_haproxy_status
bind :80
default_backend db_status
frontend db_write
bind 10.10.10.21:3306
default_backend cluster_db_write
frontend db_read
bind 10.10.10.22:3306
default_backend cluster_db_read
backend cluster_db_write
mode tcp
option tcpka
balance roundrobin
option mysql-check user gaojinbo
server mdb1 10.10.10.11:3306 weight 1 check port 3306
server mdb2 10.10.10.12:3306 weight 1 check port 3306
server mdb3 10.10.10.13:3306 weight 1 check port 3306
backend cluster_db_read
mode tcp
option tcpka
balance roundrobin
option mysql-check user gaojinbo
server mdb1 10.10.10.11:3306 weight 1 check port 3306
server mdb2 10.10.10.12:3306 weight 1 check port 3306
server mdb3 10.10.10.13:3306 weight 1 check port 3306
backend db_status
mode http
stats enable
#stats scope
#stats hide-version
stats refresh 5s
stats uri /status
stats realm Haproxy statistics
stats auth gaojinbo:gaojinbo.com
说明:
haproxy配置的5分钟超时,如果需要mysql长连接的话,修改超时设置即可
4)启动haproxy
haproxy -f /etc/haproxy.cfg MySQL多主自动同步配置并实现负载均衡健康检查